Hello everyone. On today's blog, I'll tell you about how to setup JTAG + Serial connection on the Raspberry pi 4B and configure OpenOCD to debug the RPi4b. Be sure to follow every line or you might end in problem ;)
Pre-requisite Material
Hardwares
- Raspberry Pi 4B [of course we need it ;) ]
- FT232H based FTDI module
- CH340G module or any other serial capable module
- Jumper wires
- USB extension if you don't have many USB port [ Like me :( ]
- Minicom, picocom, tio, screen or any other terminal emulator which can access serial devices
- OpenOCD for accessing target and interfaces
- GDB, prefrebably the
aarch64-none-elf-gdbgdb - telnet [ We are back to stone-age boizz ]
- PL011
- mini UART
Softwares
Setting up Serial connection using CH340G USB to TTL module
CH340G is a cheap USB to TTL module which support baud rate from 50 to 2000000 bps. You can get it for around ~$2 on Aliexpress or your local electronic shop. Although keep in mind, that this module doesn't have a DTR pin but a little hack, you can add one. Read more about it here.
Raspberry Pi has two in-built UART which are as follows:
We'll be using PL011 instead of the primary mini-UART because of the following reason:
Mini UART uses the frequency which is linked to the core frequency of GPU, so whenever the GPU frequency changes, UART baud rate changes too. This makes the mini UART unstable which may lead to data loss or corruption. The PL011 UART on the other hand, has a fixed fixed frequency which doesnt change. Although frequency of mini-UART can fixed by adding gpu_freq = 250 or 500, in the config.txt. PL011 is 16650 compatible UART, This controller also includes other features not present in the mini UART controller such as framing error detection, break detection, receive timeout interrupts and parity bit support.
Enable serial connection on raspberry pi 4B
open config.txt file in the boot partition of the SD card and append the following at the bottom.
dtoverlay = disable-bt
enable_uart=1
open cmdline.txt file in the boot partition of the SD card and append the following at the starting of line. Keep in mind about the spaces.
console=serial0,115200 console=tty1
Connection
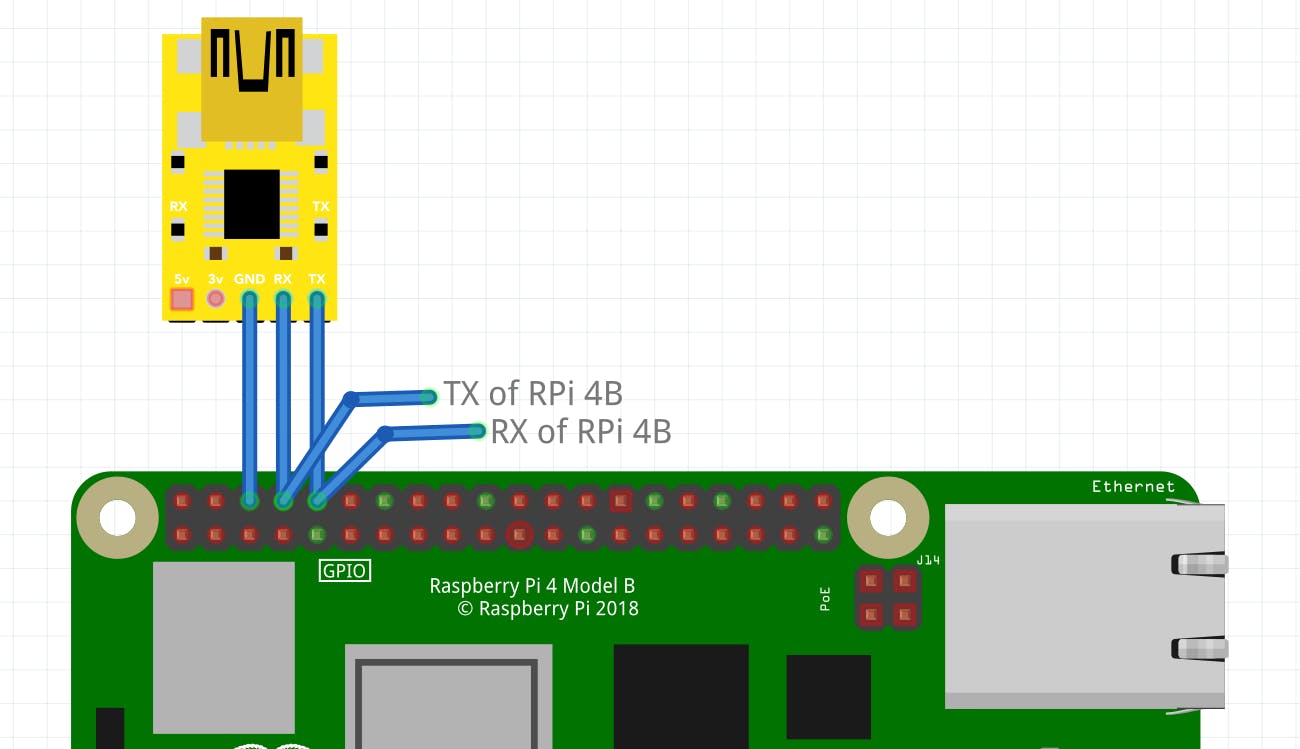
Serial connection goes from:
CH340G TX <->GPIO 15 (RX)
CH340G RX <-> GPIO 14 (RX)
GND <-> GND
 Note: This is a generic img I could find similar to CH340G
Attaching to terminal
You can check out if the USB is connected or not by using lsusb.
It should show something like :
...
Bus 001 Device 007: ID 1a86:7523 QinHeng Electronics HL-340 USB-Serial adapter
...
In order to check which port your serial device is connected to, we can use dmesg. It should show something like this
...
[ 2027.884884] ch341 1-3:1.0: ch341-uart converter detected
[ 2027.885573] usb 1-3: ch341-uart converter now attached to ttyUSB0
in my case it is /dev/ttyUSB0, so now I'll attach my terminal with serial using screen, picocom, tio or any of your choice.
sudo screen /dev/ttyUSB0 115200
               or
sudo picocom -b 115200 /dev/ttyUSB0
               or
sudo tio -b 115200 /dev/ttyUSB0
Setting up JTAG connection using FT232H module.
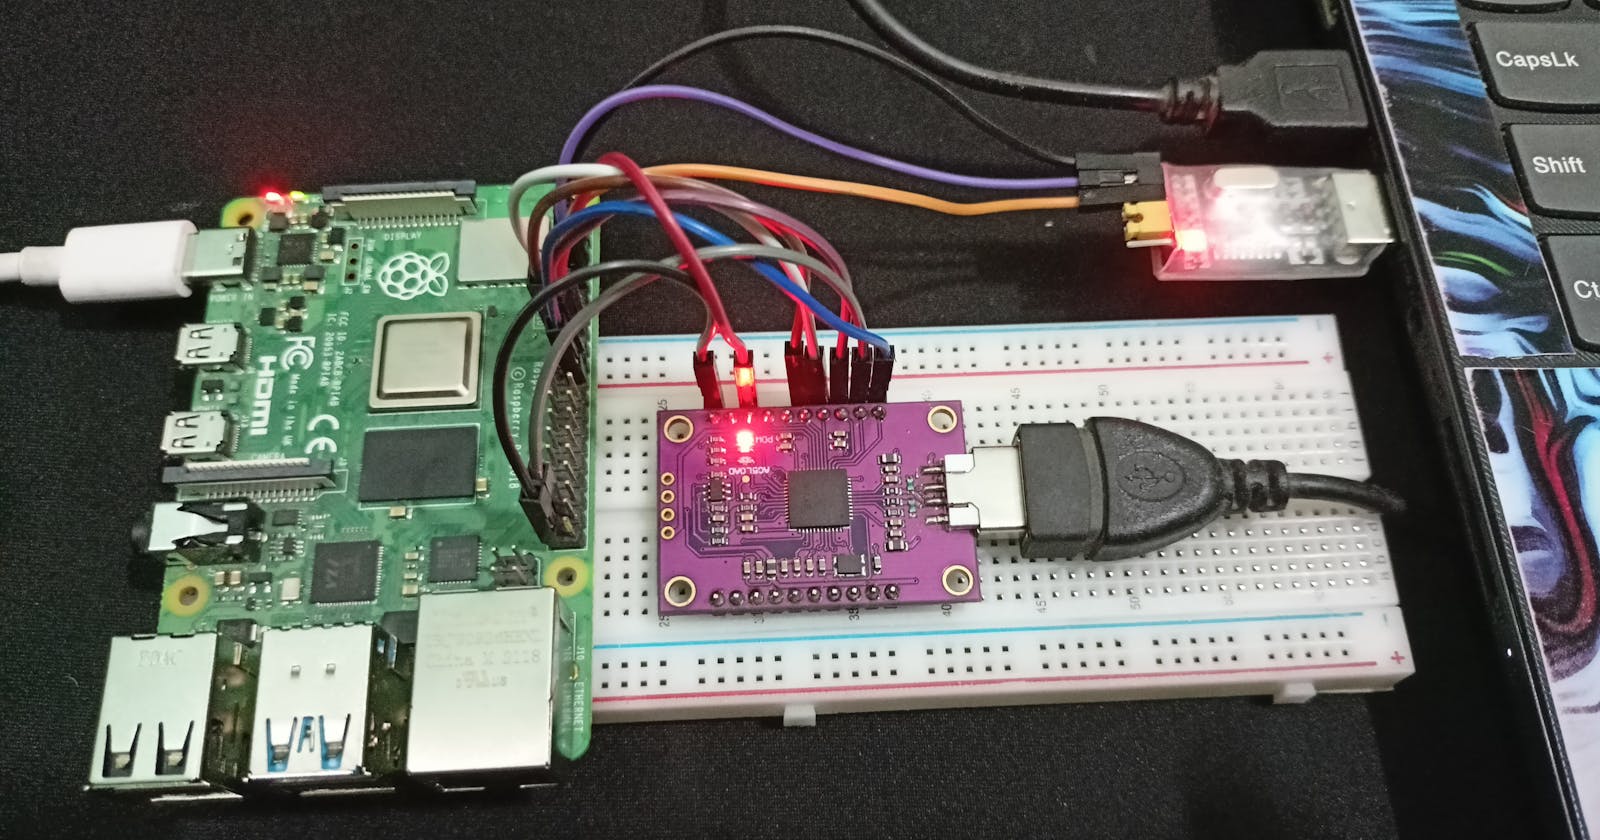
This chip from FTDI is similar to their USB to serial converter chips but adds a 'multi-protocol synchronous serial engine (MPSSE)' which allows it to speak many common protocols like SPI, I2C, serial UART, JTAG, and many more. There's even some additional digital GPIO pins that you can read and write to do things like flash LEDs, read switches or buttons, and more. For here, we are only only focusing on JTAG (MPSSE) mode. I'll be using a generic CJMCU FT232H module which I got for ~$15 from local electronic shop.
You might wonder what these led near the power led would do, even though they are not blinking. These leds needs to be setup first in order to see them blink. These are used for async communication like the serial protocol. You can get more info about this board on shukran github page.
Enable JTAG on Raspberry pi 4B
The Raspberry Pi 4 doesn't have dedicated JTAG pins. Instead, you must configure the GPIO pins (GPIO22-GPIO27) to activate the JTAG functionality. The RPi 4 documentation refers to this as Alt4 functions of those pins. Alt5 does exist too, which goes from GPIO4, 5, 6, 12 and 13. you can check this out from pinout.xyz or eLinux. In the end you should see a screen like this.
One more thing to note on JTAG with Raspberry pi 4B is that, by default, All the GPIO pins are pulled down, according to the BCM2711 documentation (see this). So in order to let the data flow freely, we will have to disable them. In the config.txt in the boot partition of SD card, append the following at the bottom.
# Disable pull downs
gpio=22-27=np

# Enable jtag pins (i.e. GPIO22-GPIO27)
enable_jtag_gpio=1
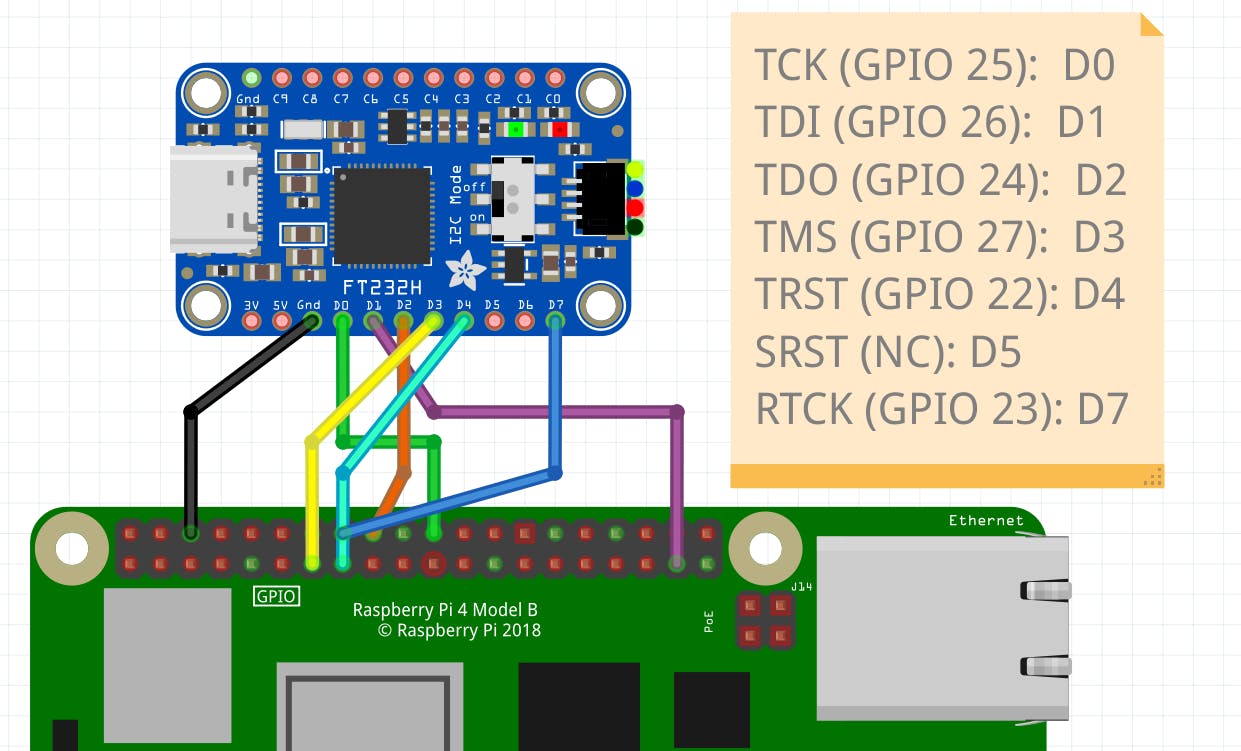
Connection
TCK (GPIO 25) <-> D0
TDI (GPIO 26) <-> D1
TDO (GPIO 24) <-> D2
TMS (GPIO 27) <-> D3
TRST (GPIO 22) <-> D4
SRST (NC) <-> NC
RTCK (GPIO 23) <-> D7

Note: D0-D7 refers to ADBUS0-ADBUS7 on the documentation of FT232H
Note: I could not find CJMCU FT232H module but the adafruit FT232H is similar to that
You can check out if the USB is connected or not by lsusb
It should show something like :
...
Bus 001 Device 009: ID 0403:6014 Future Technology Devices International, Ltd FT232H Single HS USB-UART/FIFO IC
...
Attaching with OpenOCD
Installing OpenOCD
For building OpenOCD, I would recommed to follow the steps given on this guide.
OpenOCD configuration
For FT232H, I would recommend the following configuration. This can be stored under the interface folder or anywhere you want.
# config file for generic FT232H based USB-serial adaptor
# TCK:  D0
# TDI:  D1
# TDO:  D2
# TMS:  D3
# TRST: D4
# SRST: D5
# RTCK: D7

adapter speed 3000

# Setup driver type
adapter driver ftdi

# Common PID for FT232H
ftdi vid_pid 0x0403 0x6014

ftdi layout_init 0x0078 0x017b

# Set sampling to allow higher clock speed
ftdi_tdo_sample_edge falling

ftdi layout_signal nTRST -ndata 0x0010 -noe 0x0040
ftdi layout_signal nSRST -ndata 0x0020 -noe 0x0040

# change this to 'transport select swd' if required
transport select jtag

# references
# http://sourceforge.net/p/openocd/mailman/message/31617382/
# http://www.baremetaldesign.com/index.php?section=hardware&hw=jtag
For the raspberry pi 4B configuration, I would recommend the default which comes with OpenOCD. This is stored under the target folder.
# SPDX-License-Identifier: GPL-2.0-or-later

# The Broadcom BCM2711 used in Raspberry Pi 4
# No documentation was found on Broadcom website

# Partial information is available in raspberry pi website:
# https://www.raspberrypi.org/documentation/hardware/raspberrypi/bcm2711/

if { [info exists CHIPNAME] } {
    set  _CHIPNAME $CHIPNAME
} else {
    set  _CHIPNAME bcm2711
}

if { [info exists CHIPCORES] } {
    set _cores $CHIPCORES
} else {
    set _cores 4
}

if { [info exists USE_SMP] } {
    set _USE_SMP $USE_SMP
} else {
    set _USE_SMP 0
}

if { [info exists DAP_TAPID] } {
    set _DAP_TAPID $DAP_TAPID
} else {
    set _DAP_TAPID 0x4ba00477
}

jtag newtap $_CHIPNAME cpu -expected-id $_DAP_TAPID -irlen 4
adapter speed 3000

dap create $_CHIPNAME.dap -chain-position $_CHIPNAME.cpu

# MEM-AP for direct access
target create $_CHIPNAME.ap mem_ap -dap $_CHIPNAME.dap -ap-num 0

# these addresses are obtained from the ROM table via 'dap info 0' command
set _DBGBASE {0x80410000 0x80510000 0x80610000 0x80710000}
set _CTIBASE {0x80420000 0x80520000 0x80620000 0x80720000}

set _smp_command "target smp"

for { set _core 0 } { $_core < $_cores } { incr _core } {
    set _CTINAME $_CHIPNAME.cti$_core
    set _TARGETNAME $_CHIPNAME.cpu$_core

    cti create $_CTINAME -dap $_CHIPNAME.dap -ap-num 0 -baseaddr [lindex $_CTIBASE $_core]
    target create $_TARGETNAME aarch64 -dap $_CHIPNAME.dap -ap-num 0 -dbgbase [lindex $_DBGBASE $_core] -cti $_CTINAME

    set _smp_command "$_smp_command $_TARGETNAME"
}

if {$_USE_SMP} {
    eval $_smp_command
}

# default target is cpu0
targets $_CHIPNAME.cpu0
Connect the JTAG cable to the desktop computer. On Linux, either you should use openocd with sudo, or adjust the udev rules to access the device without sudo. I am using it with sudo. OpenOCD requires 2 -f arguments, one for the target device, and one for the interface device. Invoke OpenOCD by
sudo openocd -f interface/ftdi/cjmcu-ft232h.cfg -f target/bcm2711.cfg
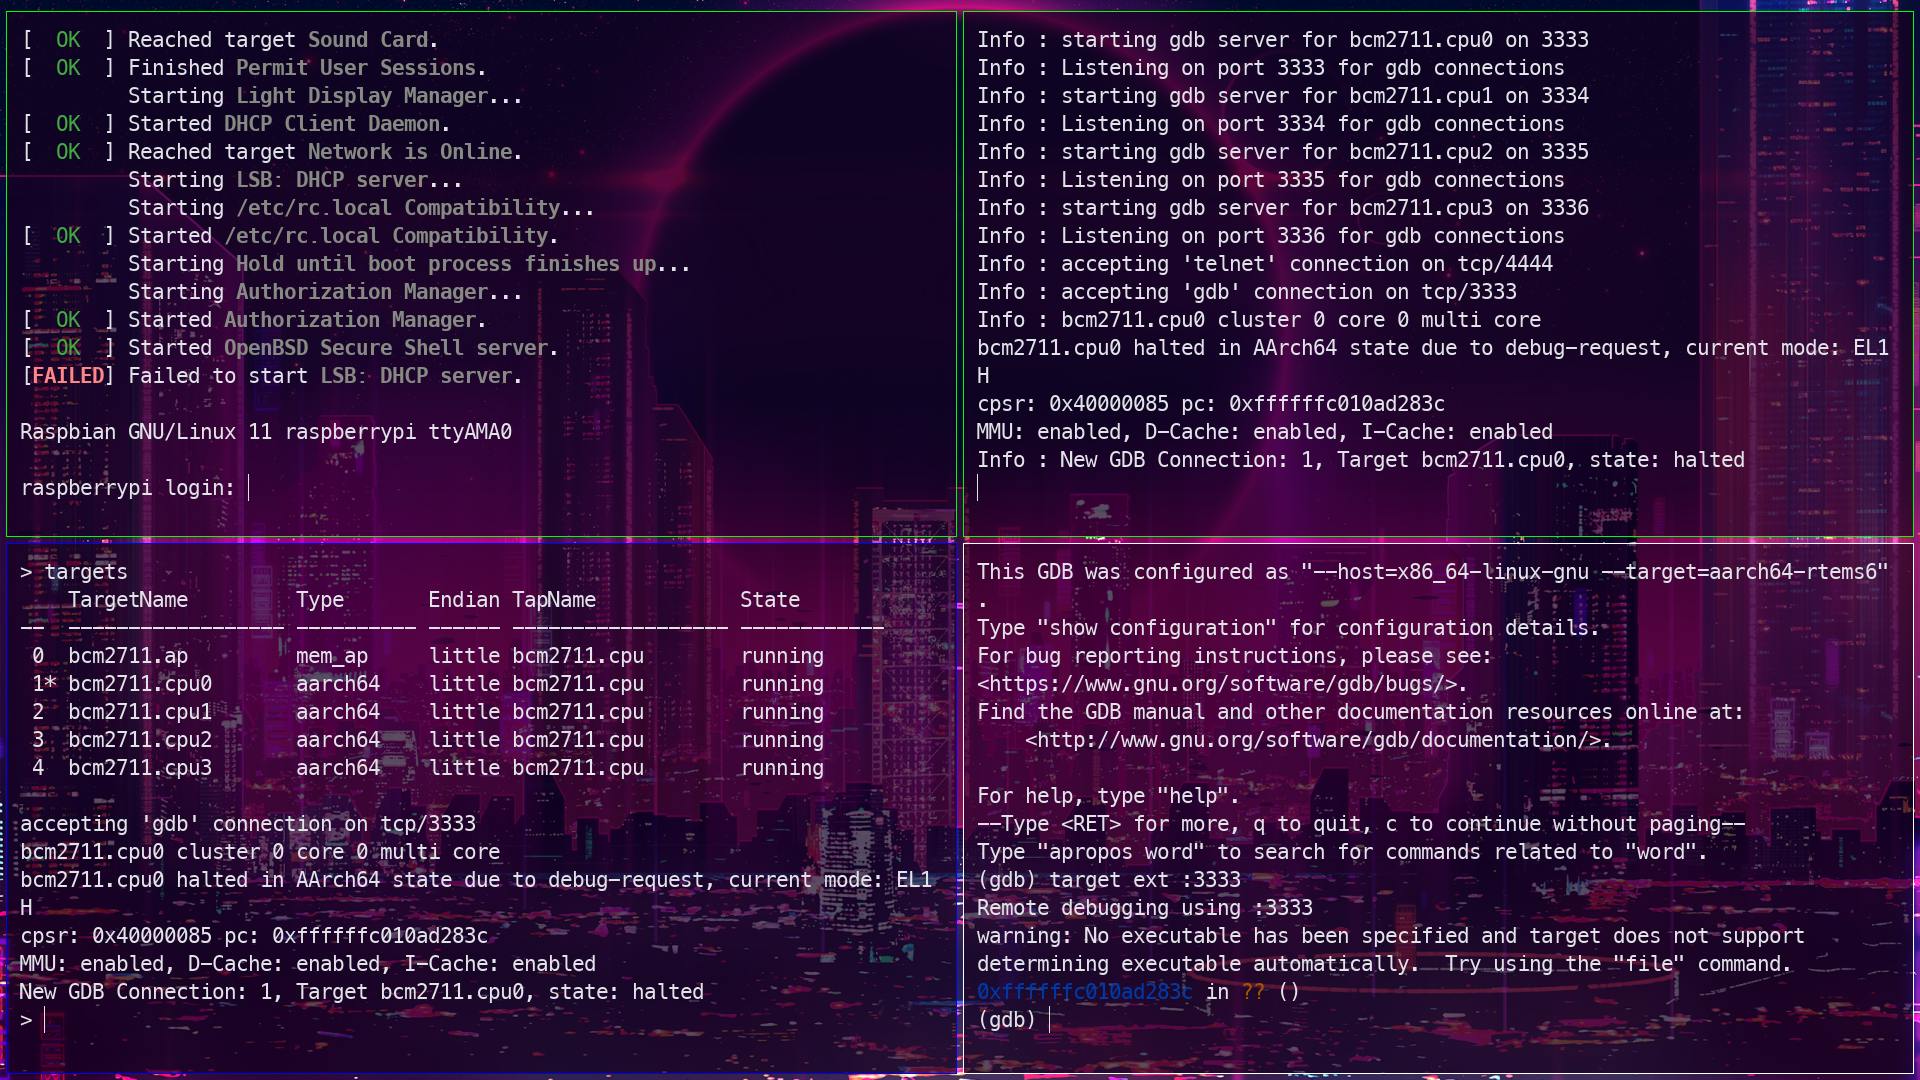
On a successful connection, you'll see a screen like below:
Open On-Chip Debugger 0.11.0+dev-00698-gcc8b49185 (2022-06-01-19:06)
Licensed under GNU GPL v2
For bug reports, read
    http://openocd.org/doc/doxygen/bugs.html
jtag
Info : Listening on port 6666 for tcl connections
Info : Listening on port 4444 for telnet connections
Info : clock speed 3000 kHz
Info : JTAG tap: bcm2711.cpu tap/device found: 0x4ba00477 (mfg: 0x23b (ARM Ltd), part: 0xba00, ver: 0x4)
Info : bcm2711.cpu0: hardware has 6 breakpoints, 4 watchpoints
Info : bcm2711.cpu1: hardware has 6 breakpoints, 4 watchpoints
Info : bcm2711.cpu2: hardware has 6 breakpoints, 4 watchpoints
Info : bcm2711.cpu3: hardware has 6 breakpoints, 4 watchpoints
Info : gdb port disabled
Info : starting gdb server for bcm2711.cpu0 on 3333
Info : Listening on port 3333 for gdb connections
Info : starting gdb server for bcm2711.cpu1 on 3334
Info : Listening on port 3334 for gdb connections
Info : starting gdb server for bcm2711.cpu2 on 3335
Info : Listening on port 3335 for gdb connections
Info : starting gdb server for bcm2711.cpu3 on 3336
Info : Listening on port 3336 for gdb connections
Connecting OpenOCD with telnet
Once we know we have OpenOCD up and running successfully, we can telnet into its CLI interface to run various JTAG commands or pre-defined routines.
telnet 127.0.0.1 4444
Running scan_chain is a quick and simple way to check if you are getting any communication over your JTAG TAP. On a successful connection, you will see something like below:
Trying 127.0.0.1...
Connected to 127.0.0.1.
Escape character is '^]'.
Open On-Chip Debugger
> scan_chain
    TapName             Enabled  IdCode     Expected   IrLen IrCap IrMask
-- ------------------- -------- ---------- ---------- ----- ----- ------
 0 auto0.tap              Y     0x4ba00477 0x4ba00477     4 0x01  0x03
GDB with OpenOCD
You can start a gdb session with openOCD by
aarch64-rtems6-gdb and then in GDB session, add target ext :3333. By using this you'll see a configuration like this.
GNU gdb (GDB) 11.2
Copyright (C) 2022 Free Software Foundation, Inc.
License GPLv3+: GNU GPL version 3 or later <http://gnu.org/licenses/gpl.html>
This is free software: you are free to change and redistribute it.
There is NO WARRANTY, to the extent permitted by law.
Type "show copying" and "show warranty" for details.
This GDB was configured as "--host=x86_64-linux-gnu --target=aarch64-rtems6".
Type "show configuration" for configuration details.
For bug reporting instructions, please see:
<https://www.gnu.org/software/gdb/bugs/>.
Find the GDB manual and other documentation resources online at:
    <http://www.gnu.org/software/gdb/documentation/>.

For help, type "help".
--Type <RET> for more, q to quit, c to continue without paging--
Type "apropos word" to search for commands related to "word".
(gdb) target ext :3333
Remote debugging using :3333
warning: No executable has been specified and target does not support
determining executable automatically.  Try using the "file" command.
0xffffffc010ad283c in ?? ()
(gdb)
Troubleshooting
If you find the serial interface is missing lots of characters and feels slow. This could be due to interference being captured by the unshielded jumper wires between the CH340G and the RPi4. It can also occur due to a long jumper wire (>50cm) or unshielded USB extension cable. Ways to resolve the interference issue is to move the setup far from things that are oscillating (e.g. fans, compressors, motors, CRTs, microwaves, radio enabled devices). If possible, its also advised to keep the exposed RPi4 on a static resistant matte and/or grounded to prevent interference or damage from static discharge.
If you're getting something like below, in the OpenOCD.
Open On-Chip Debugger 0.11.0+dev-00698-gcc8b49185 (2022-06-01-19:06)
Licensed under GNU GPL v2
For bug reports, read
    http://openocd.org/doc/doxygen/bugs.html
jtag
Info : Listening on port 6666 for tcl connections
Info : Listening on port 4444 for telnet connections
Info : clock speed 10000 kHz
Error: JTAG scan chain interrogation failed: all ones
Error: Check JTAG interface, timings, target power, etc.
Error: Trying to use configured scan chain anyway...
Error: bcm2711.cpu: IR capture error; saw 0x0f not 0x01
Warn : Bypassing JTAG setup events due to errors
Error: Invalid ACK (7) in DAP response
Error: JTAG-DP STICKY ERROR
This is usually caused by interference, not connecting device properly or Pi not being booted properly. Check out serial to check if the pi is booting or not. Double check your connection and use as short wire as possible (I used wire of 10cm only). If not sure about the pinouts, check out pinout.xyz .
Conclusion
In this blog, we have learnt about how to connect raspberry pi 4B with serial module, setup JTAG connection, OpenOCD configuration for FT232H module and how to connect OpenOCD with GDB. Gathering All this info took me some time, there's a lot of guide about how to setup raspberry pi with FT2322H but not with this. In the end you'll see a screen like this. Hopefully someone in the future will find this to be helpful ;) Like, comment, subscribe and share it with your friends (。•̀ᴗ-)✧
 If you encounter any issues or have any thoughts on this article, please leave a comment below. I'll get back to you as soon as I can.
